module-bundler

Module Bundler는 프론트엔드 개발자들이 주로 사용하며 JavaScript 모듈을 브라우저에서 실행할 수 있는 단일 JavaScript 파일로 묶는 데 사용되는 도구이다.

최신 모듈 번들러 예시

  • webpack
  • rollup
  • fusebox
  • parcel

다음과 같은 이유로 Module Bundler를 필요로 할 수 있다.

  • 브라우저는 모듈 시스템을 지원하지 않지만 오늘날에는 완전히 사실이 아닙니다.
  • 코드의 종속성 관계를 관리하는 데 도움이 되며 종속성 순서로 모듈을 로드합니다.
  • 종속성 순서, 이미지 자산, CSS 자산 등으로 자산을 로드하는 데 도움이 됩니다.

Module?

Module이란 프로그래밍 관점에서 특정 기능을 갖는 작은 코드 단위를 의미합니다.

JavaScript의 Simple Example

1
2
3
4
5
6
7
8
9
10
11
12
// math.js
function sum(a, b) {
return a + b;
}

function substract(a, b) {
return a - b;
}

const pi = 3.14;

export { sum, substract, pi };

이 math.js 파일은 아래와 같이 3가지 기능을 갖고 있는 Module이다.

  • 두 숫자의 합을 구하는 sum() 함수
  • 두 숫자의 차를 구하는 substract() 함수
  • 원주율 값을 갖는 pi 상수

이처럼 성격이 비슷한 기능들을 하나의 의미 있는 파일로 관리하면 Module로 취급된다.

Why Need Bundler

설명을 위해 여러 JavaScript 파일로 구성된 웹 응용 프로그램을 구축하는 상황을 가정해보자

아래는 필요한 JavaScript 파일을 html에 추가하는 예시

1
2
3
4
5
6
7
<html>
<script src="/src/foo.js"></script>
<script src="/src/bar.js"></script>
<script src="/src/baz.js"></script>
<script src="/src/qux.js"></script>
<script src="/src/quux.js"></script>
</html>

각 파일에는 5개의 왕복 요청인 별도의 http 요청이 필요하다.

따라서 5개의 파일을 모두 하나로 결합할 수 있다면 더 효율적이다.

1
2
3
<html>
<script src="/dist/bundle.js"></script>
</html>

Bundle Problem

  • 포함될 “파일” 의 순서를 어떻게 유지?
    • “파일” 사이에 일종의 종속성 순서가 있으면 좋음
  • “파일” 간의 이름 충돌을 방지하려면?
  • 번들 내에서 사용되지 않은 “파일”을 어떻게 확인?

다음과 같이 각 파일 간의 관계를 알면 이 모든 것을 해결할 수 있습니다.

  • 어떤 파일이 다른 파일에 종속되어 있는지?
  • 파일에서 노출되는 인터페이스는 무엇?
  • 어떤 노출된 인터페이스가 다른 사람에 의해 사용되고 있습니까?

부여된 이러한 정보는 각각 제기된 문제를 해결할 수 있다.

따라서 우리에게 필요한 것은 파일 간의 관계를 설명하는 선언적 방법이며, 이는 우리를 JavaScript 모듈 시스템으로 이끈다.

CommonJS & ES6 Module

CommonJS 또는 ES6 모듈은 우리가 의존하고 있는 파일과 파일에서 사용 중인 인터페이스를 지정할 수 있는 방법을 제공한다.

1
2
3
4
5
6
7
// CommonJS
const foo = require('./foo');
module.exports = bar;

// ES Modules
import foo from './foo';
export default bar;

How Bundle?

모듈 시스템에서 수집한 정보로 어떻게 파일을 함께 연결하고 모든 것을 캡슐화하는 번들 파일을 생성할까?

대표적인 2개의 Module Bundler를 사용

  • webpack
  • rollup

우리는 3개의 파일을 가지고 있다고 가정해보자

  • circle.js
  • square.js
  • app.js
1
2
3
4
5
6
7
8
9
10
11
12
13
14
// filename: circle.js
const PI = 3.141;
export default function area(radius) {
return PI * radius * radius;
}
// filename: square.js
export default function area(side) {
return side * side;
}
// filename: app.js
import squareArea from './square';
import circleArea from './circle';
console.log('Area of square: ', squareArea(5));
console.log('Area of circle', circleArea(5));

“웹팩 방식”

“webpack 방식” 번들은 어떻게 생겼을까?

1
2
3
4
5
6
7
8
9
10
11
12
13
14
15
16
17
18
19
20
21
22
23
24
25
// filename: webpack-bundle.js
const modules = {
'circle.js': function (exports, require) {
const PI = 3.141;
exports.default = function area(radius) {
return PI * radius * radius;
};
},
'square.js': function (exports, require) {
exports.default = function area(side) {
return side * side;
};
},
'app.js': function (exports, require) {
const squareArea = require('square.js').default;
const circleArea = require('circle.js').default;
console.log('Area of square: ', squareArea(5));
console.log('Area of circle', circleArea(5));
},
};

webpackStart({
modules,
entry: 'app.js',
});
  • 첫째, 가장 먼저 눈에 띄는 것은 Module Map 이다. 모듈 이름을 함수로 래핑된 모듈 자체에 매핑하는 사전입니다. Module Map은 항목을 추가하여 모듈을 쉽게 등록할 수 있다.

  • 둘째, 각 모듈은 함수로 Wrapping 된다. 이 함수는 모듈 내에서 선언된 모든 것이 자체 내에서 범위가 지정되는 모듈 범위를 시뮬레이션합니다. 함수 자체를 Module Factory Function라고 합니다. 모듈이 인터페이스를 내보내고 다른 모듈에서 요구할 수 있도록 몇 가지 매개 변수를 사용한다.

  • 셋째, 어플리케이션이 시작되고 webpackStart는 모든 것을 함께 붙여주는 함수이다. 종종 런타임 이라고 하는 함수 자체는 번들에서 가장 중요한 부분이다. 모듈 맵입력 모듈을 사용하여 애플리케이션을 시작한다.

1
2
3
4
5
6
7
8
9
10
11
12
13
14
15
16
17
18
19
20
21
22
23
// filename: webpack-bundle.js

function webpackStart({ modules, entry }) {
const moduleCache = {};
const require = (moduleName) => {
// if in cache, return the cached version
if (moduleCache[moduleName]) {
return moduleCache[moduleName];
}
const exports = {};
// this will prevent infinite "require" loop
// from circular dependencies
moduleCache[moduleName] = exports;

// "require"-ing the module,
// exported stuff will assigned to "exports"
modules[moduleName](exports, require);
return moduleCache[moduleName];
};

// start the program
require(entry);
}

webpackStart require functionmodule cache의 2가지를 정의한다.

require 기능은 CommonJS의 기능과 다르다.

require 구문은 exported interface를 module로 부터 반환한다.
예시: circle.js 라면 -> { default: function area(radius){ ... } } 반환

내보낸 인터페이스는 모듈 캐시에 캐시되므로 동일한 모듈 이름의 require를 반복적으로 호출하면 모듈 팩토리 함수가 한 번만 실행됩니다.

require가 정의된 상태에서 애플리케이션을 시작하는 것은 입력 모듈을 “요구”하는 것뿐입니다.

“롤업 방식”

이제 “롤업 방식” 번들을 살펴보자.

1
2
3
4
5
6
7
8
9
10
11
12
13
// filename: rollup-bundle.js
const PI = 3.141;

function circle$area(radius) {
return PI _ radius _ radius;
}

function square$area(side) {
return side \* side;
}

console.log('Area of square: ', square$area(5));
console.log('Area of circle', circle$area(5));
  • 첫째, 롤업 번들의 주요 차이점은 웹팩 번들에 비해 훨씬 작다. “webpack 방식”에 비해 모듈 맵 이 없으며, 모든 모듈은 번들로 “평평하게” 정의된다. 모듈의 래핑 function이 없다. 모듈 내에서 선언된 모든 변수/함수는 이제 전역 범위로 선언된다.

혹시 개별 모듈 범위에서 선언된 모든 것이 전역 범위로 선언된 경우 2개의 모듈이 동일한 이름의 변수/함수를 선언한다면?

  • 롤업은 이름 충돌이 발생하지 않도록 변수/함수 이름을 변경한다.
  • 예시에서 circle.js and square.js는 모두 function area(){} 모듈 내에서 선언 되었으며 번들될 때 충돌을 피하기 위해 두 함수와 그 사용법이 모두 이름이 변경된 것을 볼 수 있다.

모듈을 함수로 래핑하지 않는 부작용 중 하나의 동작이다 eval. 자세한 설명 은 문서를 참조

  • 둘째, 번들 내 모듈의 순서가 문제가 있을 수 있다. circle$area -> square$area -> console.log 순서대로 ​​작동하지만 temporal dead zone 때문에 PI전에 선언해야한다.

따라서 종속성 순서대로 모듈을 정렬하는 것은 “롤업 방식”에 중요하다.

대체로 “롤업 방식”이 “웹팩 방식”보다 나은 것 같아보인다. 모든 기능을 제거하여 더 작은 번들과 더 적은 런타임 오버헤드를 갖는 특징이 있다.

요약

  • 모듈 번들러 는 여러 JavaScript 모듈을 하나의 JavaScript 파일로 결합하는 데 큰 도움이 된다.
  • “웹팩 방식”
    • 모듈 맵 사용
    • 함수를 사용하여 각 모듈을 래핑
    • 모듈을 함께 연결하는 런타임 코드가 있음
  • “롤업 방식”
    • 더 평평하고 작은 묶음
    • 모듈을 래핑하기 위해 함수를 사용하지 않음
    • 순서 문제, 종속성을 기반으로 한 정렬 필요
    • 순환 종속성이 작동하지 않을 수 있음

참고자료

js-proxy

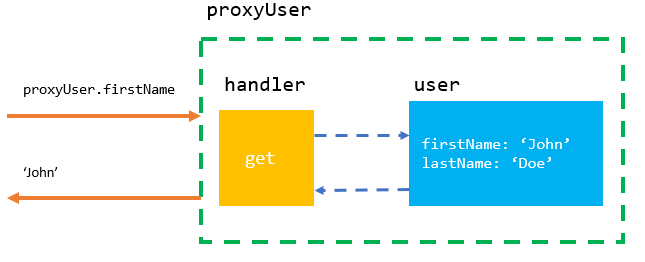
Proxy는 특정 객체를 감싸 프로퍼티 읽기, 쓰기와 같은 객체에 가해지는 작업을 중간에서 가로채는 객체이다.

가로채진 작업은 Proxy 자체에서 처리되기도 하고, 원래 객체가 처리하도록 그대로 전달되기도 한다.

Creating a proxy object

1
let proxy = new Proxy(target, handler);
  • target – 감싸게 될 객체로, 함수를 포함한 모든 객체 포함
  • handler – 동작을 가로채는 메서드인 ‘트랩(trap)’이 담긴 객체로, 여기서 Proxy를 설정

A simple proxy example

1
2
3
4
5
6
7
8
9
10
11
12
13
14
const user = {
firstName: 'John',
lastName: 'Doe',
email: 'john.doe@example.com',
}

const handler = {
get(target, property) {
console.log(`Property ${property} has been read.`);
return target[property];
}
}

const proxyUser = new Proxy(user, handler);

js-proxy

1
2
3
4
5
6
console.log(proxyUser.firstName);
console.log(proxyUser.lastName);
// Property firstName has been read.
// John
// Property lastName has been read.
// Doe

user 객체에 proxyUser로 접근할경우 get() 메서드가 호출된다.

1
2
3
4
user.firstName = 'Jane';
console.log(proxyUser.firstName);
// Property firstName has been read.
// Jane

user 객체를 변경하면 proxyUser에도 반영된다.

1
2
proxyUser.lastName = 'William';
console.log(user.lastName); // William

proxyUser 객체를 변경해도 user에 반영된다.

Proxy Traps

The get() trap

일반적으로 get() 메서드에 커스텀한 로직을 작성하여 property에 접근할 때 get() trap을 발생시킬 수 있다.

1
2
3
4
5
6
7
8
9
10
11
12
13
14
15
16
const user = {
firstName: 'John',
lastName: 'Doe'
}

const handler = {
get(target, property) {
return property === 'fullName' ?
`${target.firstName} ${target.lastName}` :
target[property];
}
};

const proxyUser = new Proxy(user, handler);

console.log(proxyUser.fullName); // John Doe

The set() trap

set() traptargetproperty가 set될때 발생한다.

1
2
3
4
5
6
7
8
9
10
11
12
13
14
15
16
17
18
19
20
21
22
23
24
25
const user = {
firstName: 'John',
lastName: 'Doe',
age: 20
}

const handler = {
set(target, property, value) {
if (property === 'age') {
if (typeof value !== 'number') {
throw new Error('Age must be a number.');
}
if (value < 18) {
throw new Error('The user must be 18 or older.')
}
}
target[property] = value;
}
};

const proxyUser = new Proxy(user, handler);

proxyUser.age = 'foo'; // Error: Age must be a number.
proxyUser.age = '16'; // The user must be 18 or older.
proxyUser.age = 21; // OK.

The apply() trap

apply() trap은 함수가 호출될때 발생한다.

1
2
3
4
5
6
7
8
9
10
11
12
13
14
15
16
17
18
19
20
21
22
let proxy = new Proxy(target, {
apply: function(target, thisArg, args) {
//...
}
});

const user = {
firstName: 'John',
lastName: 'Doe'
}

const getFullName = function (user) {
return `${user.firstName} ${user.lastName}`;
}

const getFullNameProxy = new Proxy(getFullName, {
apply(target, thisArg, args) {
return target(...args).toUpperCase();
}
});

console.log(getFullNameProxy(user)); // JOHN DOE

proxy trap의 작동 시점

내부 메서드 핸들러 메서드 작동 시점
[[Get]] get 프로퍼티를 읽을 때
[[Set]] set 프로퍼티에 쓸 때
[[HasProperty]] has in 연산자가 동작할 때
[[Delete]] deleteProperty delete 연산자가 동작할 때
[[Call]] apply 함수를 호출할 때
[[Construct]] construct new 연산자가 동작할 때
[[GetPrototypeOf]] getPrototypeOf Object.getPrototypeOf
[[SetPrototypeOf]] setPrototypeOf Object.setPrototypeOf
[[IsExtensible]] isExtensible Object.isExtensible
[[PreventExtensions]] preventExtensions Object.preventExtensions
[[DefineOwnProperty]] defineProperty Object.defineProperty, Object.defineProperties
[[GetOwnProperty]] getOwnPropertyDescriptor Object.getOwnPropertyDescriptor, for..in, Object.keys/values/entries
[[OwnPropertyKeys]] ownKeys Object.getOwnPropertyNames, Object.getOwnPropertySymbols, for..in, Object/keys/values/entries

참고자료

후기

js proxy는 다양한 라이브러리와 프레임워크에서 사용되고 있다고 한다.

잘 활용해서 JS 환경에서 좀 더 클린하고 효율적인 코드를 작성할 수 있지 않을까 기대를 해본다.